Carousel posts – What are they? Why use them? How do you create them?
What’s a Carousel Post?
If you’re not sure what Carousel Posts on LinkedIn are, don’t worry, you’re by no means alone. Carousel posts are one of the most effective yet most under-used features of LinkedIn.
You may have seen them used as advertisements or simple image carousels designed to get readers curious enough to visit a landing page or your profile.
That can work but I think there’s a much more effective way to use this feature for increasing exposure of your content and deepening engagement with your ideal target audience.
Carousel posts have a simple structure. You write a very brief, compelling post about an issue that will be of immediate relevance to your audience. Then upload straight into the post a PDF document or PowerPoint slide deck that expands on the topic.
The first page or slide will show up just below the text of your post. Your audience will see clickable arrows on the image so that they can easily flick through the pages.
If you keep clicking the images keep rolling round. Hence the name ‘carousel’.
Why Use Carousel Posts?
Before we dive into the nitty gritty detail about how to create great carousel posts that people will want to read, here are 5 reasons why it’s worth considering in the first place:
- They help to increase engagement without spending money on ads (for me that’s a good enough reason all by itself)
- People who don’t like reading ads will read a carousel post designed only to inform
- They’re easy to create. You can use material you’ve already created for other purposes
- They stand out in the news feed because they occupy more space than other posts
- You don’t need any extra gear as you would if you want to do great videos
4 Easy Steps to create and publish a Carousel Post on LinkedIn
Step 1
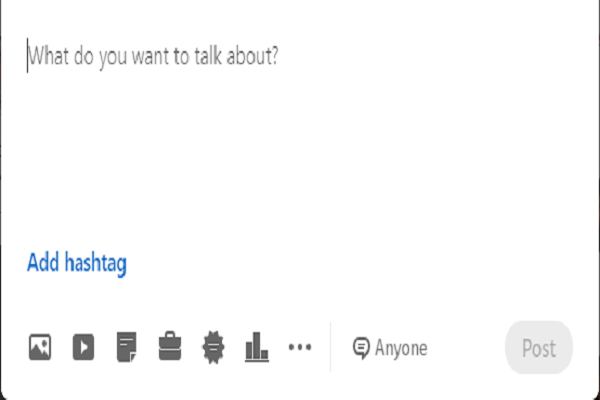
Login to your LinkedIn home page, where you find your news feed. Right at the top of the page you’ll see the space for creating a post. Simply click on “Start a post” as you would for any normal status post.
That will open up the space where you can write the copy I mentioned a little earlier.
Don’t try to write this yet! That’s a later step.
Just below the space you can write in you will see buttons that allow you to add your hashtags and attach the item you’ve decided to use as your carousel.
This is what you’ll see

Step 2
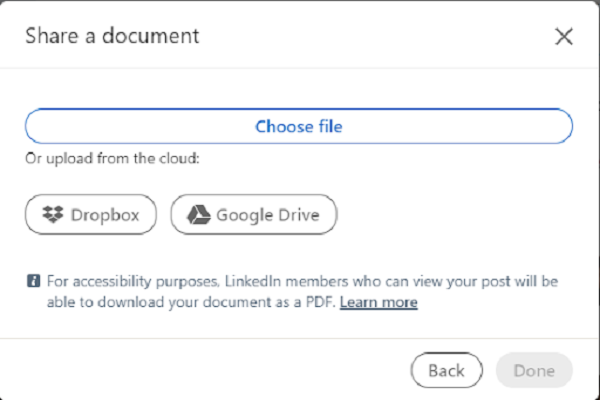
Select the document icon and upload your PowerPoint or PDF file directly from its source.
If you don’t have a PDF or PowerPoint slide deck that you want to use for this you can also upload documents from Dropbox, OneDrive or GoogleDrive, so you do have plenty of options. (OneDrive isn’t showing as an option on the image below as I’m not using it.)

Step 3
Every copywriter knows how important a post title or the first one to two lines can be in getting people to read the content. This applies to your document as well as the first two lines of the “teaser” post you wrote in Step 1.
Make it catchy and hard to ignore so that your readers naturally want to click through. You do not have to use the original title of the document if it isn’t compelling enough. Get creative!
Step 4
OK, now it’s time to let those writing skills loose.
Go back to the space labelled “What do you want to talk about” and write a brief compelling post to explain how your audience will benefit from viewing the PDF, slide deck or whatever document you’ve uploaded
Don’t give everything away. This needs to “tease” them a little to entice them to click on the first page of the carousel.
So you can see how this looks in real life here are two examples, one with a very short slide deck and one with a longer PDF:
Pro tips
- PDF is usually the best format irrespective of how the original was created
- Keep your visual branding consistent
- Keep the document you’ve uploaded visually interesting. Colour? Graphics?
- Lots of people will read it on a mobile so check your font size and spacing
- Once you’ve posted a carousel post you can’t edit or change it
A final word – don’t make this mistake!
Carousel posts are a great tool for building engagement and connecting more deeply with your audience. But there’s one little extra step that far too many people ignore.
It’s likely that you’ll be using a document or slide deck that was originally built for a different purpose. So make certain that at the end it includes a clear and compelling Call To Action.
After doing all this work to generate a higher level of interest and awareness of what you, this is a golden opportunity to get your readers to respond in some way.
Don’t miss out on this.=
And if you’re interested in boosting your business growth through LinkedIn…
P.S. Here are 5 ways we can help you accelerate your Lead Generation results:
1. Grab our free 4-Week LinkedIn Profile Optimisation Course
It’s the road map to positioning your profile in the top 5% of the 750+ million LinkedIn members – Click Here
2. Join our FREE LinkedIn Group and connect with entrepreneurs who are scaling too
It’s our Facebook community where smart entrepreneurs learn to get more leads and smart ways to scale using LinkedIn — Click Here
3. Register for our FREE LinkedIn update webinar
Every 10-Weeks you can join us for a free update on all the latest news, ninja tips and outline of new features released by LinkedIn – Click Here
4. Join our LinkedIn Inner Circle Solo Program on our Free Trial Click Here for more details
5. Work with our team privately
You might be surprised to know what exactly we do, it’s a little different to what you may expect. Watch this short video that outline the 3 outcomes you will achieve working with us – CLICK Here


